2018年7月からHTTPのサイトでChromeの強制的な警告表示が出るようになりました。
どのサイトでもSSL化必須ということで、CentOS7 + Apache2.4環境で無料のSSL「Let's Encrypt」の導入を試してみました。
★関連記事
CentOS6 + Apache2 を無料のSSL「Let's Encrypt」でSSL化
念のため無料のSSLですが暗号強度的には変わりはありません。
https://ssl.sakura.ad.jp/column/free-or-paid/
そもそも無料のSSL(というかドメイン認証)って安全なの?ということでSSLサーバー証明書の違いなど。
https://ssl.sakura.ad.jp/column/attestation-level/
流石、さくらさん「Let's Encrypt」の運営元のISRGのスポンサーだけあって資料がとてもわかりやすいです。
そういえば以前に上場企業がDV証明書を使っていて議論になっていたことがありました。
https://twitter.com/HiromitsuTakagi/status/1004013636883382274
余談ですがこちらのサイトはクレジットカードの流出があって既にEV証明書を使っているのですが。
http://www.itmedia.co.jp/news/articles/1805/10/news062.html
そして本家サイトがSSL無しというところも風情があって。。。
さて、実際問題としてサイトを立てていく上で都度EV認証とかはポリシーによってはあまり現実的でないケースもあるので、DV証明書の中でも使い勝手の良い証明書の「Let's Encrypt」の導入を試してみます。
「Let's Encrypt」を運用していく上での大きな特徴は以となります。
・基本無料である
・更新は90日で行う
・更新はツールで自動更新を行うため、コマンドベースのクライアントが必要
今回導入する環境は「CentOS7.5 + Apache2.4」です。
インストール
Let's Encryptで使うクライアントツールはACMEプロトコルに対応したCertbotというクライアントが必要です。
http://jxck.hatenablog.com/entry/letsencrypt-acme
CentOS7ではApache用のCertbotクライアントは、EPELリポジトリからインストールすることができます。
以下ではEPELのリポジトリも導入していますが、設定済みの方は上の行は必要ありません。
|
1 2 3 4 |
# yum -y install epel-release # yum -y install certbot python-certbot-apache |
次のようにオプションを指定して certbot コマンドを実行します。
以下では「example.com」となっていますが、-d オプションには、証明書を発行するサーバーのドメインを入れてください。
-w オプションでは DocumentRoot のパスを指定します。
|
1 2 3 4 5 6 7 8 9 10 11 12 13 14 15 16 17 18 19 20 21 22 23 24 25 26 27 28 29 30 31 |
# certbot certonly --non-interactive --agree-tos --webroot -w /var/www/html -d example.com --email foo@gmail.com Saving debug log to /var/log/letsencrypt/letsencrypt.log Plugins selected: Authenticator webroot, Installer None Starting new HTTPS connection (1): acme-v01.api.letsencrypt.org Obtaining a new certificate Performing the following challenges: http-01 challenge for dexample.com Using the webroot path /var/www/html for all unmatched domains. Waiting for verification... Cleaning up challenges IMPORTANT NOTES: - Congratulations! Your certificate and chain have been saved at: /etc/letsencrypt/live/example.com/fullchain.pem Your key file has been saved at: /etc/letsencrypt/live/example.com/privkey.pem Your cert will expire on 2018-10-28. To obtain a new or tweaked version of this certificate in the future, simply run certbot again. To non-interactively renew *all* of your certificates, run "certbot renew" - Your account credentials have been saved in your Certbot configuration directory at /etc/letsencrypt. You should make a secure backup of this folder now. This configuration directory will also contain certificates and private keys obtained by Certbot so making regular backups of this folder is ideal. - If you like Certbot, please consider supporting our work by: Donating to ISRG / Let's Encrypt: https://letsencrypt.org/donate Donating to EFF: https://eff.org/donate-le |
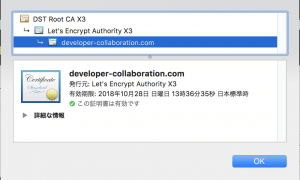
上記のように「Congratulations!」と出て入れば導入は完了です。
証明書関連のファイルを以下で確認してみます。
|
1 2 3 4 5 6 7 8 |
# ls -l /etc/letsencrypt/live/example.com/ -rw-r--r-- 1 root root 682 Jul 30 14:36 README lrwxrwxrwx 1 root root 51 Jul 30 14:36 cert.pem -> ../../archive/example.com/cert1.pem lrwxrwxrwx 1 root root 52 Jul 30 14:36 chain.pem -> ../../archive/example.com/chain1.pem lrwxrwxrwx 1 root root 56 Jul 30 14:36 fullchain.pem -> ../../archive/example.com/fullchain1.pem lrwxrwxrwx 1 root root 54 Jul 30 14:36 privkey.pem -> ../../archive/example.com/privkey1.pem |
「サーバ証明書(公開鍵)」、「中間証明書」、「サーバ証明書と中間証明書が結合されたファイル」、「秘密鍵」の4つのファイルができます。
ApacheにSSLの設定は以下で実施できます。
尚、「サーバ証明書と中間証明書が結合されたファイル(fullchain.pem)」を設定すれば個別に中間証明書は必要ありません。
|
1 2 3 4 5 6 7 |
# vi /etc/httpd/conf.d/ssl.conf -----------------------------変更 SSLCertificateFile /etc/letsencrypt/live/example.com/fullchain.pem SSLCertificateKeyFile /etc/letsencrypt/live/example.com/privkey.pem ----------------------------- |
apacheを再起動します。
|
1 2 3 |
# systemctl restart httpd |
これで無事SSLのインストールが実施できました。
自動更新の設定
「Let's Encrypt」では証明書は90日で切れてしまいます。
そこで、cron などで定期的なクライアントのインストールを実行します。
|
1 2 3 4 5 6 |
# crontab -e -----------------------------追加 30 2 * * * /usr/bin/certbot renew >> /var/log/le-renew.log ----------------------------- |
上記のコマンドで証明書の有効期限が30日以内になると、再インストールを行います。
「--force-renewal」のオプションをつけていないので上記日数にならないとインストールは行いません。
毎日実行していますが、こちらは「Let's Encrypt」に負荷をかけません。
尚、証明書の再インストールが行われると自動的にapacheの再起動を行います。
https://www.digitalocean.com/community/tutorials/how-to-secure-apache-with-let-s-encrypt-on-centos-7
このブログは株式会社CoLabMixによる技術ブログです。
GCP、AWSなどでのインフラ構築・運用や、クローリング・分析・検索などを主体とした開発を行なっています。
Ruby on RailsやDjango、Pythonなどの開発依頼などお気軽にお声がけください。
開発パートナーを増やしたいという企業と積極的に繋がっていきたいです。
お問い合わせやご依頼・ご相談など